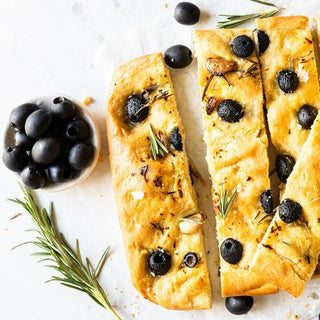
There are few things better than the smell of hot bread, especially when it’s topped with garlic, olives and rosemary and you know you get to eat it! Focaccia is so versatile, delicious as is, great for soaking up that last bit of pasta sauce, dipping in homemade soup or gourmet sandwich! And guess what is so easy to make, check out this easy recipe below!
Not a fan of olives? You can be as create as you want with your toppings! People have been making focaccia art, using lots of colours and shapes to create pictues! Your focaccia dough is your canvas!
Ingredients:
Focaccia Dough:
- 1 2/3 cups bread flour
- 4 tsp white sugar
- 1 1/4 tsp salt
- 1 tsp instant / rapid rise yeast
- 3/4 cup very warm water
- 1 1/2 tbsp extra virgin olive oil
- 125g/ 1/2 cup (packed) boiled and mashed potato , (around 1/2 large potato)
- 4 tbsp extra virgin olive oil
- 1/4 tsp sea salt flakes (for top)
Toppings:
- 3 garlic cloves chopped
- 3/4 cup extra virgin olive oil
- 2 1/2 tsp finely chopped rosemary leaves (fresh)
- ½ cup pitted, halved olives
Method:
Create Dough
- Peel potato, cut into 2.5cm / 1" chunks. Boil until fully tender (around 10 – 15 mins; check centre with skewer). Drain and mash very well with a potato ricer or masher until smooth and lump-free. Set aside to cool, and measure out required quantity.
- Place flour, salt, sugar and yeast in a large bowl and mix well with a firm rubber spatula.
- Make a well in the centre, then add olive oil and warm water. Mix with spatula until you can no longer see flour. Dough should be sticky – too sticky to knead by hand.
- Add mashed potato. Using a folding motion, start mixing it through using the spatula. Then start smearing it along the walls of the bowl. Once potato is evenly incorporated, shape roughly into a ball in the bowl.
- Cover bowl with cling wrap, then put in a warm place (25°C/77°F) for 30 minutes until it increases in volume by 50% or up to double in size.
- Get another large bowl, drizzle with 2 teaspoons of olive oil then use your hands to smear it around the bowl. Scrape dough in, then fold the edges of the dough into the centre six times. Shape into ball, cover with cling wrap.
- Put the bowl in a warm place (25°C/77°F) for 30 minutes until it increases in volume by 50% or up to double in size.
- Meanwhile, prepare the pan. Use a 26.5 x 20 x 5 cm / 10.5 x 8 x 2” metal non-stick pan, or a 9”/23cm round cake pan, preferably not springform. Pour in 2 tablespoons of olive oil, then smear it all across the base and along the walls.
- Preheat oven to 220°C, and set a rack on middle shelf. Allow enough time to ensure oven has been preheated for at least 15 mins for best results.
- Scrape dough into prepared pan. Stretch and pull to fill the base as best you can (itʼs an elastic dough so a bit stubborn!), and get the surface roughly level.
- Cover pan with cling wrap, then put in a warm place for 40 minutes until the dough expands and fills the pan, and the heigh rises by around 25 – 30%.
Prepare for baking:
- Drizzle the surface with 2 teaspoons of olive oil, and smear/rub it over lightly with your hands.
- Using both your hands like claws, push your fingers deep into the dough, right to the base of the pan to create the signature dimples. Do this around half a dozen times across dough surface. This will somewhat deflate the dough and is OK. (Note 8)
- Top with toppings of choice, place olives, garlic and rosemary on top.
- Drizzle the surface with 2 tablespoons of olive oil so it runs into the dimples. Then sprinkle with sea salt flakes.
Bake:
- Bake for 25 – 30 minutes until the top is deep golden and lightly crisp, while the sides are fried and crusty.
- Turn out onto a cooling rack. Let is rest for at least 10 minutes before cutting to serve. It is ridiculously good served freshly made!


